现在前端的框架很多,为什么选择 Angular?这个问题几年以来一直都有人在争执,网上也有大把的文章在讨论在纠结,甚至在攻击。然而作为一枚开发人员,觉得合适自己上手方便就好。最热门的话题莫过于 Angular和Vue之争。
个人认为适合 Angular的使用人群如下:(注:NG==Angular2+)
- 技术偏执狂
我们寻求一种一栈式的开发工具链,不管是编译,打包,压缩,单元测试都能在框架内解决。 - 不喜欢引入大量三方插件
典型的比如路由,JS异步加载,UI - 大型前端项目
NG的模块化和依赖注入,天然支持大型多人协作项目,方便开发和单元测试。 - 非IE重度用户
我们有的项目还是IE8为主,导致我只能使用knockout.js来做视图数据绑定 - 注开源项目的维护氛围
很显然NG是Google花了大价钱的项目,react也是Facebook的大项目,而Vue诚然是靠个人核心人员支撑。不是损谁,在这点上Vue确实劣势很大,虽然目前跟阿里的Wexx项目有了良好的合作。但是阿里的开源项目一般是三而竭的烂尾工程。这里有篇文章:https://my.oschina.net/mumu/blog/1499815,详细对比了与Vue的方方面面感觉是大陆 Angular的勤劳的布道者。
以上其实都是些题外话,国内的程序员就是技术阵营站位太激烈。其实适合自己就好,管别人怎么说。。。
下面开始进入主题
只要是Google的技术,因为伟大的GWF我们需要VPN翻墙。如果没有我们可以改hosts文件。
环境准备:
本篇不是0入门的指导文章,所以怎么安装自行查询资料。
1,安装Nodejs
https://nodejs.org/en/download/,选择适合自己OS的版本安装。1
2
3
4
5C:\Users\gongxufan>node -v
v6.11.0
C:\Users\gongxufan>npm -v
3.10.10
2,安装cnpm
墙的存在,还是使用阿里的镜像服务吧,地址:https://cnpmjs.org/
3,使用Google的搜索服务,查看NG官方文档
修改本机hosts,地址:https://coding.net/u/scaffrey/p/hosts/git/blob/master/hosts,这个仓库会持续更新最新可用的IP。
好啦,环境准备好了,我们可以愉快的安装cli啦。1
2
3
4
5
6
7
8
9
10
11
12
13
14
15
16
17
18
19
20
21
22
23
24
25
26
27
28
29
30
31
32
33
34
35
36C:\Users\gongxufan>cnpm install -g @angular/cli
Downloading @angular/cli to C:\Users\gongxufan\AppData\Roaming\npm\node_modules\@angular\cli_tmp
Copying C:\Users\gongxufan\AppData\Roaming\npm\node_modules\@angular\cli_tmp\_@angular_cli@1.2.6@@angular\cli to C:\Users\gongxufan\AppData\Roaming\npm\node_modules\@angular\cli
Installing @angular/cli's dependencies to C:\Users\gongxufan\AppData\Roaming\npm\node_modules\@angular\cli/node_modules
[1/61] circular-dependency-plugin@^3.0.0 installed at node_modules\_circular-dependency-plugin@3.0.0@circular-dependency-plugin
[2/61] denodeify@^1.2.1 installed at node_modules\_denodeify@1.2.1@denodeify
[3/61] @ngtools/json-schema@1.1.0 installed at node_modules\_@ngtools_json-schema@1.1.0@@ngtools\json-schema
[4/61] ember-cli-string-utils@^1.0.0 installed at node_modules\_ember-cli-string-utils@1.1.0@ember-cli-string-utils
[5/61] core-object@^3.1.0 installed at node_modules\_core-object@3.1.3@core-object
[6/61] chalk@^2.0.1 installed at node_modules\_chalk@2.0.1@chalk
[7/61] diff@^3.1.0 installed at node_modules\_diff@3.3.0@diff
[8/61] file-loader@^0.10.0 installed at node_modules\_file-loader@0.10.1@file-loader
[9/61] ember-cli-normalize-entity-name@^1.0.0 installed at node_modules\_ember-cli-normalize-entity-name@1.0.0@ember-cli-normalize-entity-name
[10/61] get-caller-file@^1.0.0 installed at node_modules\_get-caller-file@1.0.2@get-caller-file
[11/61] exports-loader@^0.6.3 installed at node_modules\_exports-loader@0.6.4@exports-loader
[12/61] heimdalljs-logger@^0.1.9 installed at node_modules\_heimdalljs-logger@0.1.9@heimdalljs-logger
[13/61] css-loader@^0.28.1 installed at node_modules\_css-loader@0.28.4@css-loader
[14/61] glob@^7.0.3 installed at node_modules\_glob@7.1.2@glob
[15/61] inflection@^1.7.0 installed at node_modules\_inflection@1.12.0@inflection
[16/61] heimdalljs@^0.2.4 installed at node_modules\_heimdalljs@0.2.5@heimdalljs
[17/61] isbinaryfile@^3.0.0 installed at node_modules\_isbinaryfile@3.0.2@isbinaryfile
[18/61] fs-extra@^4.0.0 installed at node_modules\_fs-extra@4.0.1@fs-extra
[19/61] karma-source-map-support@^1.2.0 installed at node_modules\_karma-source-map-support@1.2.0@karma-source-map-support
[20/61] license-webpack-plugin@^0.4.2 installed at node_modules\_license-webpack-plugin@0.4.3@license-webpack-plugin
根据你的网速和运气,安装时间都不同,耐心等待哦。
[html] view plain copy
C:\Users\gongxufan>ng -v
_ _ ____ _ ___
/ \ _ __ __ _ _ _| | __ _ _ __ / ___| | |_ _|
/ △ \ | '_ \ / _` | | | | |/ _` | '__| | | | | | |
/ ___ \| | | | (_| | |_| | | (_| | | | |___| |___ | |
/_/ \_\_| |_|\__, |\__,_|_|\__,_|_| \____|_____|___|
|___/
@angular/cli: 1.2.6
node: 6.11.0
os: win32 x64
哈哈,弄好了,还来个非主流的log。
体验NG
有了脚手架程序,我们可以方便的新建项目,新建组件和单元测试啦。D:\code\learn\angualr>ng set --global packageManager=cnpm
首先我们设置好NG的全局依赖包管理器为cnpm,否则新建项目的时候默认使用npm导致依赖包下载失败。接着正式创建项目:1
2
3
4
5
6
7
8
9
10
11
12
13
14
15
16
17
18
19
20
21
22
23
24
25
26
27
28
29
30
31
32
33
34
35D:\code\learn\angualr>ng new first-ng-prj
installing ng
create .editorconfig
create README.md
create src\app\app.component.css
create src\app\app.component.html
create src\app\app.component.spec.ts
create src\app\app.component.ts
create src\app\app.module.ts
create src\assets\.gitkeep
create src\environments\environment.prod.ts
create src\environments\environment.ts
create src\favicon.ico
create src\index.html
create src\main.ts
create src\polyfills.ts
create src\styles.css
create src\test.ts
create src\tsconfig.app.json
create src\tsconfig.spec.json
create src\typings.d.ts
create .angular-cli.json
create e2e\app.e2e-spec.ts
create e2e\app.po.ts
create e2e\tsconfig.e2e.json
create .gitignore
create karma.conf.js
create package.json
create protractor.conf.js
create tsconfig.json
create tslint.json
Installing packages for tooling via cnpm.
Installed packages for tooling via cnpm.
Successfully initialized git.
Project 'first-ng-prj' successfully created.
耐心等待依赖包的下载,如果一切顺利就可以测试啦。开始启动程序测试:1
2
3
4
5
6
7
8
9
10D:\code\learn\angualr>cd first-ng-prj && ng serve --open
** NG Live Development Server is listening on localhost:4200, open your browser on http://localhost:4200 **
10% building modules 8/11 modules 3 active ...ader@0.13.2@style-loader\addStyles.jsHash: bc29b49835d5d651317a
Time: 10929ms
chunk {0} polyfills.bundle.js, polyfills.bundle.js.map (polyfills) 177 kB {4} [initial] [rendered]
chunk {1} main.bundle.js, main.bundle.js.map (main) 5.36 kB {3} [initial] [rendered]
chunk {2} styles.bundle.js, styles.bundle.js.map (styles) 10.7 kB {4} [initial] [rendered]
chunk {3} vendor.bundle.js, vendor.bundle.js.map (vendor) 2.19 MB [initial] [rendered]
chunk {4} inline.bundle.js, inline.bundle.js.map (inline) 0 bytes [entry] [rendered]
webpack: Compiled successfully.
如果一切顺利,就会打开系统默认浏览器显示我们的项目,至此NG的环境搭建完毕。
NG代码结构
通过cli程序,会创建标准的NG的项目文件
整个目录结构如下图所示
文件说明
e2e/
在e2e/下是端到端(End-to-End)测试。 它们不在src/下,是因为端到端测试实际上和应用是相互独立的,它只适用于测试你的应用而已。 这也就是为什么它会拥有自己的tsconfig.json。
node_modules/
Node.js创建了这个文件夹,并且把package.json中列举的所有第三方模块都放在其中。
.angular-cli.json
Angular CLI的配置文件。 在这个文件中,我们可以设置一系列默认值,还可以配置项目编译时要包含的那些文件。 要了解更多,请参阅它的官方文档。
.editorconfig
给你的编辑器看的一个简单配置文件,它用来确保参与你项目的每个人都具有基本的编辑器配置。 大多数的编辑器都支持.editorconfig文件,详情参见 http://editorconfig.org 。
.gitignore
一个Git的配置文件,用来确保某些自动生成的文件不会被提交到源码控制系统中。
karma.conf.js
给Karma的单元测试配置,当运行ng test时会用到它。
package.json
npm配置文件,其中列出了项目使用到的第三方依赖包。 你还可以在这里添加自己的自定义脚本。
protractor.conf.js
给Protractor使用的端到端测试配置文件,当运行ng e2e的时候会用到它。
README.md
项目的基础文档,预先写入了CLI命令的信息。 别忘了用项目文档改进它,以便每个查看此仓库的人都能据此构建出你的应用。
tsconfig.json
TypeScript编译器的配置,你的IDE会借助它来给你提供更好的帮助。
tslint.json
给TSLint和Codelyzer用的配置信息,当运行ng lint时会用到。 Lint功能可以帮你保持代码风格的统一。
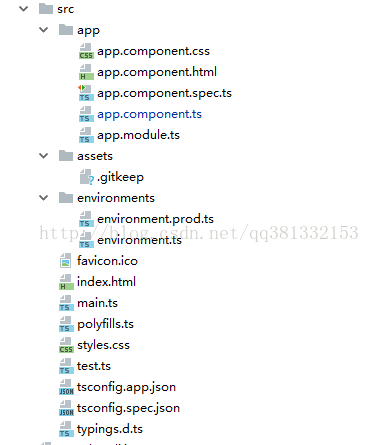
src是我们业务代码文件夹,结构如下
app/app.component.{ts,html,css,spec.ts}
使用HTML模板、CSS样式和单元测试定义AppComponent组件。 它是根组件,随着应用的成长它会成为一棵组件树的根节点。
app/app.module.ts
定义AppModule,这个根模块会告诉Angular如何组装该应用。 目前,它只声明了AppComponent。 稍后它还会声明更多组件。
assets/*
这个文件夹下你可以放图片等任何东西,在构建应用时,它们全都会拷贝到发布包中。
environments/*
这个文件夹中包括为各个目标环境准备的文件,它们导出了一些应用中要用到的配置变量。 这些文件会在构建应用时被替换。 比如你可能在产品环境中使用不同的API端点地址,或使用不同的统计Token参数。 甚至使用一些模拟服务。 所有这些,CLI都替你考虑到了。
favicon.ico
每个网站都希望自己在书签栏中能好看一点。 请把它换成你自己的图标。
index.html
这是别人访问你的网站是看到的主页面的HTML文件。 大多数情况下你都不用编辑它。 在构建应用时,CLI会自动把所有js和css文件添加进去,所以你不必在这里手动添加任何

